Latest Cisco, PMP, AWS, CompTIA, Microsoft Materials on SALE Get Now Get Now
Home/
Blog/
Building a Switched Campus Network That Scales: Design, Vendors, Configuration, and Refresh Planning
SPOTO 2026-07-30 10:57:19
Building a Switched Campus Network That Scales

A switched campus network is the backbone that connects every user, device, and access point across a building or corporate site — and getting the design wrong early on tends to create scaling headaches years later. This guide walks through the full lifecycle: choosing the right architectural model, picking hardware from the vendors that actually compete in this space today, configuring the VLAN and routing layer that makes segmentation work, and finally, planning the hardware refresh and power budget that keeps the network sustainable long-term.

Choosing Your Campus Architecture: Three-Tier vs. Collapsed Core

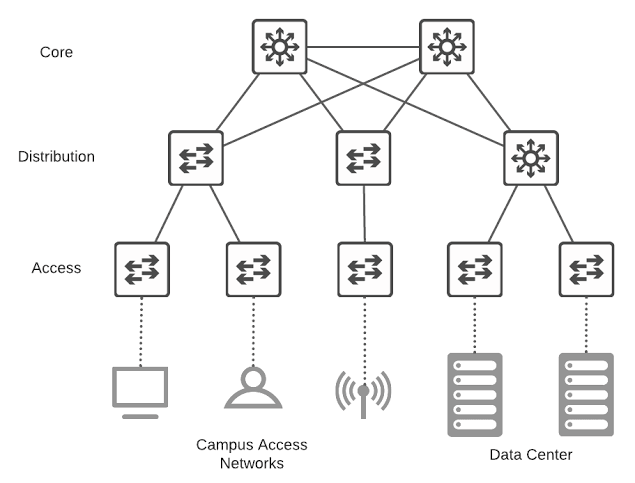
The first decision in any campus network design is how many layers of switching sit between your end devices and your routed core. There are two dominant models, and the right one depends almost entirely on campus size.

  1. Start with the access layer, regardless of architecture. Every campus design begins with access switches — the ones physically connecting end devices, phones, and access points. This layer handles port security, VLAN assignment, and Power over Ethernet (PoE) delivery, and its design doesn't change much between the two models below.
  2. Decide whether you need a distribution layer. In a traditional three-tier architecture, a distribution layer sits between access and core, aggregating multiple access switches, handling inter-VLAN routing, and enforcing policy before traffic reaches the core. This layer earns its keep in large campuses — typically multiple buildings or floors with dozens of access switches — because it localizes routing decisions and contains failure domains.
  3. Consider collapsing distribution and core for smaller sites. A collapsed core architecture merges the distribution and core layers into a single tier, with access switches connecting directly to a pair of high-capacity core switches that also perform routing. This reduces hardware cost, cabling complexity, and hop count — ideal for a single building or a small-to-medium campus where a full three-tier design would be over-engineered.
  4. Build redundancy into whichever model you choose. Both architectures should use dual uplinks from every access switch to two distribution or core switches, with a first-hop redundancy protocol (such as HSRP or VRRP) protecting the default gateway. Redundancy isn't a "nice to have" tier — it's what keeps a single switch or link failure from taking down a whole floor.
  5. Size your core for growth, not current load. Whether you go three-tier or collapsed core, the core (or collapsed core/distribution) layer should be sized with headroom for at least the next hardware refresh cycle — typically 3–5 years — since core upgrades are far more disruptive than access-layer swaps.
  6. Match uplink bandwidth to access-layer density. As you add more high-density access switches (especially ones powering Wi-Fi 6E/7 access points), make sure uplink bandwidth between tiers scales accordingly — a common oversight is upgrading access switches without upgrading the uplinks feeding them, which just moves the bottleneck up one layer.

The practical rule of thumb: if you're managing a single building or a handful of wiring closets, a collapsed core keeps things simple and cost-effective; once you're coordinating multiple buildings or need to isolate routing domains for scale, the three-tier model earns its added complexity.

Comparing Campus Switch Vendors: Cisco, Aruba, and Fortinet

Once your architecture is settled, the next decision is hardware. The competitive landscape shifted meaningfully in 2025, so it's worth comparing where each vendor actually stands today rather than relying on older comparisons.

Criteria Cisco (Catalyst) HPE Aruba Networking Fortinet (FortiSwitch)
Core strength Robust architecture and global reputation, with a large base of trained professionals and consistent performance across industries One of the strongest Cisco alternatives specifically for campus switching and wireless Strongest fit when the network design is security-led rather than pure switching performance
Portfolio breadth (post-2025) Broadest standalone campus/data center/wireless lineup Following HPE's 2025 acquisition of Juniper Networks, the combined HPE Networking portfolio broadened across campus, wireless, routing, data center, and AI-driven operations Positions itself as the only vendor offering fully converged wired and wireless networking with AI-powered security through a single platform
Typical use case Data centers, campuses, and WAN connectivity, with strong access-layer, core, and edge networking integration Large campus and wireless-heavy deployments wanting a single vendor across switching, Wi-Fi, and (now) routing SD-Branch and campus deployments where security integration with a firewall platform is a priority
Security integration Strong via Cisco's broader security portfolio, sold as a complementary layer Strong via Aruba ClearPass and, increasingly, integration across the expanded HPE/Juniper stack Deep native integration with FortiGate for unified management and policy enforcement
Management model CLI plus cloud/on-prem management tools depending on product line Centralized cloud-native management (Aruba Central) across switching and wireless Single-pane-of-glass administration regardless of how users or devices connect
Price positioning Generally positioned at a premium compared to other vendors Mid-to-premium, varies significantly by acquired product line Positioned as a cost-effective option, especially when bundled with existing FortiGate infrastructure
Best fit Large enterprises standardizing on a broad, mature ecosystem Organizations prioritizing unified campus + wireless with growing routing ambitions Organizations where security policy, not just switching throughput, drives network design

No single vendor wins on every axis — the right choice depends on whether your priority is ecosystem maturity (Cisco), a newly broadened campus-to-routing portfolio (HPE Aruba), or tight security-switching convergence (Fortinet). Many organizations shortlist based on what they already run for firewalls or wireless, since switch management increasingly ties into that existing platform.

Configuring VLAN Segmentation and Inter-VLAN Routing

With architecture and hardware chosen, the practical work begins: segmenting traffic with VLANs and enabling routing between them. The steps below use standard Cisco-style CLI syntax, but the same logical sequence applies across most enterprise switch platforms with adjusted command syntax.

  1. Create your VLANs on the switch.
switch(config)# vlan 10
switch(config-vlan)# name DATA
switch(config)# vlan 20
switch(config-vlan)# name VOICE
switch(config)# vlan 99
switch(config-vlan)# name MANAGEMENT
  1. Assign access ports to their VLAN.
switch(config)# interface range gigabitEthernet 1/0/1-24
switch(config-if-range)# switchport mode access
switch(config-if-range)# switchport access vlan 10
switch(config-if-range)# switchport voice vlan 20
  1. Configure trunk ports between access and distribution/core switches.
switch(config)# interface gigabitEthernet 1/0/48
switch(config-if)# switchport mode trunk
switch(config-if)# switchport trunk allowed vlan 10,20,99
switch(config-if)# switchport trunk native vlan 99
  1. Enable inter-VLAN routing with Switch Virtual Interfaces (SVIs) on your distribution or collapsed-core switch.
switch(config)# ip routing
switch(config)# interface vlan 10
switch(config-if)# ip address 10.10.10.1 255.255.255.0
switch(config)# interface vlan 20
switch(config-if)# ip address 10.10.20.1 255.255.255.0
  1. Add first-hop redundancy if you have dual distribution/core switches.
switch(config)# interface vlan 10
switch(config-if)# standby 10 ip 10.10.10.1
switch(config-if)# standby 10 priority 110
switch(config-if)# standby 10 preempt
  1. Verify VLAN and trunk state before troubleshooting further.
switch# show vlan brief
switch# show interfaces trunk
switch# show standby brief
  1. Troubleshoot latency or connectivity issues systematically. Check for VLAN mismatches on trunk ports first (the most common cause of "phantom" connectivity issues), then confirm spanning-tree isn't blocking an expected path, and finally check for duplex/speed mismatches on uplinks — all three account for the large majority of real-world campus VLAN problems.

Once VLANs, trunks, and routing are verified end-to-end, the segmentation itself becomes largely "set and forget" — most ongoing work at this layer is adding new VLANs as departments or device types are onboarded, not re-architecting what's already running.

Planning a Campus Switch Refresh and PoE Power Budget

The final piece of the lifecycle is knowing when and how to refresh access-layer hardware — particularly as PoE demands grow with more access points, phones, and IoT devices. Use the templates below as working documents for your own refresh project.

CAMPUS SWITCH REFRESH CHECKLIST
================================

[ ] Phase 1: Current-state audit
    - Inventory all switch models, firmware versions, and
      end-of-support/end-of-life dates
    - Document current port utilization per switch
      (% of ports actively used)
    - Record current PoE draw per switch vs. rated PoE budget

[ ] Phase 2: Future requirements
    - List planned device additions (APs, phones, cameras,
      IoT sensors) for the next 3-5 years
    - Confirm PoE class needed per device type
      (802.3af / 802.3at / 802.3bt)
    - Note any multi-gig (2.5G/5G) uplink requirements for
      Wi-Fi 6E/7 access points

[ ] Phase 3: Vendor and model shortlist
    - Shortlist 2-3 vendors based on comparison criteria above
    - Request quotes with matching port count, PoE budget,
      and uplink speed
    - Confirm licensing model (perpetual vs. subscription)
      for management/cloud features

[ ] Phase 4: Migration planning
    - Define cutover order (least critical closets first)
    - Plan maintenance windows per switch/closet
    - Pre-stage configs before physical swap
    - Confirm rollback plan per closet

[ ] Phase 5: Post-refresh validation
    - Verify VLAN, trunk, and routing config matches pre-refresh
    - Confirm PoE draw is within new budget with headroom
    - Update documentation and asset inventory
POE POWER BUDGET CALCULATION TEMPLATE
=======================================

Per-device PoE draw (typical, plan for worst case):
  802.3af (PoE)     : up to 15.4W  delivered,  ~12.95W at device
  802.3at (PoE+)    : up to 30W    delivered,  ~25.5W  at device
  802.3bt (PoE++)   : up to 60-90W delivered,  ~51-71W at device

Budget formula per switch:
  Required PoE budget = (Number of devices per class) x
                         (Per-device draw for that class) x
                         (Safety margin, typically 1.2x)

Example worksheet:
  Device type          | Count | Class    | Draw/device | Subtotal
  ----------------------|-------|----------|-------------|----------
  VoIP phones           |  __   | 802.3af  | 12.95W      | ____
  Wi-Fi 6E APs           |  __   | 802.3at  | 25.5W       | ____
  Wi-Fi 7 APs             |  __   | 802.3bt  | 51-71W      | ____
  IP cameras (PTZ)       |  __   | 802.3bt  | 51-71W      | ____
  IoT sensors (misc)     |  __   | 802.3af  | 12.95W      | ____
  ----------------------------------------------------------------
  Subtotal (sum above)                                    : ____
  x Safety margin (1.2)                                   : ____
  = Required switch PoE budget                             : ____

  Compare against candidate switch's rated PoE budget.
  If required budget exceeds ~80% of rated budget,
  shortlist a higher-PoE-budget model or add a switch.

Running the audit and calculation above before requesting vendor quotes ensures you're comparing switches on the metric that actually matters for your environment — total usable PoE budget with headroom — rather than just port count or list price.

Bringing It All Together

A switched campus network holds together when each layer is deliberately chosen rather than inherited from whatever was installed last: pick collapsed core or three-tier based on your actual campus size, choose a vendor whose strengths align with what's driving your network — ecosystem maturity, unified wireless-and-routing, or security convergence — configure VLANs and routing with redundancy built in from day one, and refresh hardware based on a real PoE and capacity audit rather than a fixed replacement cycle. Get those four decisions right, and the network becomes something you're managing proactively instead of firefighting.
Latest Passing Reports from SPOTO Candidates
sec lab

sec lab

EI lab

EI lab

EI LAB

EI LAB

Sec lab

Sec lab

DClab

DClab

EI Lab

EI Lab

DC lab

DC lab

DC LAB

DC LAB

dc lab

dc lab

sec lab

sec lab

Write a Reply or Comment
Home/Blog/Building a Switched Campus Network That Scales: Design, Vendors, Configuration, and Refresh Planning
Building a Switched Campus Network That Scales: Design, Vendors, Configuration, and Refresh Planning
SPOTO 2026-07-30 10:57:19
Building a Switched Campus Network That Scales

A switched campus network is the backbone that connects every user, device, and access point across a building or corporate site — and getting the design wrong early on tends to create scaling headaches years later. This guide walks through the full lifecycle: choosing the right architectural model, picking hardware from the vendors that actually compete in this space today, configuring the VLAN and routing layer that makes segmentation work, and finally, planning the hardware refresh and power budget that keeps the network sustainable long-term.

Choosing Your Campus Architecture: Three-Tier vs. Collapsed Core

The first decision in any campus network design is how many layers of switching sit between your end devices and your routed core. There are two dominant models, and the right one depends almost entirely on campus size.

  1. Start with the access layer, regardless of architecture. Every campus design begins with access switches — the ones physically connecting end devices, phones, and access points. This layer handles port security, VLAN assignment, and Power over Ethernet (PoE) delivery, and its design doesn't change much between the two models below.
  2. Decide whether you need a distribution layer. In a traditional three-tier architecture, a distribution layer sits between access and core, aggregating multiple access switches, handling inter-VLAN routing, and enforcing policy before traffic reaches the core. This layer earns its keep in large campuses — typically multiple buildings or floors with dozens of access switches — because it localizes routing decisions and contains failure domains.
  3. Consider collapsing distribution and core for smaller sites. A collapsed core architecture merges the distribution and core layers into a single tier, with access switches connecting directly to a pair of high-capacity core switches that also perform routing. This reduces hardware cost, cabling complexity, and hop count — ideal for a single building or a small-to-medium campus where a full three-tier design would be over-engineered.
  4. Build redundancy into whichever model you choose. Both architectures should use dual uplinks from every access switch to two distribution or core switches, with a first-hop redundancy protocol (such as HSRP or VRRP) protecting the default gateway. Redundancy isn't a "nice to have" tier — it's what keeps a single switch or link failure from taking down a whole floor.
  5. Size your core for growth, not current load. Whether you go three-tier or collapsed core, the core (or collapsed core/distribution) layer should be sized with headroom for at least the next hardware refresh cycle — typically 3–5 years — since core upgrades are far more disruptive than access-layer swaps.
  6. Match uplink bandwidth to access-layer density. As you add more high-density access switches (especially ones powering Wi-Fi 6E/7 access points), make sure uplink bandwidth between tiers scales accordingly — a common oversight is upgrading access switches without upgrading the uplinks feeding them, which just moves the bottleneck up one layer.

The practical rule of thumb: if you're managing a single building or a handful of wiring closets, a collapsed core keeps things simple and cost-effective; once you're coordinating multiple buildings or need to isolate routing domains for scale, the three-tier model earns its added complexity.

Comparing Campus Switch Vendors: Cisco, Aruba, and Fortinet

Once your architecture is settled, the next decision is hardware. The competitive landscape shifted meaningfully in 2025, so it's worth comparing where each vendor actually stands today rather than relying on older comparisons.

Criteria Cisco (Catalyst) HPE Aruba Networking Fortinet (FortiSwitch)
Core strength Robust architecture and global reputation, with a large base of trained professionals and consistent performance across industries One of the strongest Cisco alternatives specifically for campus switching and wireless Strongest fit when the network design is security-led rather than pure switching performance
Portfolio breadth (post-2025) Broadest standalone campus/data center/wireless lineup Following HPE's 2025 acquisition of Juniper Networks, the combined HPE Networking portfolio broadened across campus, wireless, routing, data center, and AI-driven operations Positions itself as the only vendor offering fully converged wired and wireless networking with AI-powered security through a single platform
Typical use case Data centers, campuses, and WAN connectivity, with strong access-layer, core, and edge networking integration Large campus and wireless-heavy deployments wanting a single vendor across switching, Wi-Fi, and (now) routing SD-Branch and campus deployments where security integration with a firewall platform is a priority
Security integration Strong via Cisco's broader security portfolio, sold as a complementary layer Strong via Aruba ClearPass and, increasingly, integration across the expanded HPE/Juniper stack Deep native integration with FortiGate for unified management and policy enforcement
Management model CLI plus cloud/on-prem management tools depending on product line Centralized cloud-native management (Aruba Central) across switching and wireless Single-pane-of-glass administration regardless of how users or devices connect
Price positioning Generally positioned at a premium compared to other vendors Mid-to-premium, varies significantly by acquired product line Positioned as a cost-effective option, especially when bundled with existing FortiGate infrastructure
Best fit Large enterprises standardizing on a broad, mature ecosystem Organizations prioritizing unified campus + wireless with growing routing ambitions Organizations where security policy, not just switching throughput, drives network design

No single vendor wins on every axis — the right choice depends on whether your priority is ecosystem maturity (Cisco), a newly broadened campus-to-routing portfolio (HPE Aruba), or tight security-switching convergence (Fortinet). Many organizations shortlist based on what they already run for firewalls or wireless, since switch management increasingly ties into that existing platform.

Configuring VLAN Segmentation and Inter-VLAN Routing

With architecture and hardware chosen, the practical work begins: segmenting traffic with VLANs and enabling routing between them. The steps below use standard Cisco-style CLI syntax, but the same logical sequence applies across most enterprise switch platforms with adjusted command syntax.

  1. Create your VLANs on the switch.
switch(config)# vlan 10
switch(config-vlan)# name DATA
switch(config)# vlan 20
switch(config-vlan)# name VOICE
switch(config)# vlan 99
switch(config-vlan)# name MANAGEMENT
  1. Assign access ports to their VLAN.
switch(config)# interface range gigabitEthernet 1/0/1-24
switch(config-if-range)# switchport mode access
switch(config-if-range)# switchport access vlan 10
switch(config-if-range)# switchport voice vlan 20
  1. Configure trunk ports between access and distribution/core switches.
switch(config)# interface gigabitEthernet 1/0/48
switch(config-if)# switchport mode trunk
switch(config-if)# switchport trunk allowed vlan 10,20,99
switch(config-if)# switchport trunk native vlan 99
  1. Enable inter-VLAN routing with Switch Virtual Interfaces (SVIs) on your distribution or collapsed-core switch.
switch(config)# ip routing
switch(config)# interface vlan 10
switch(config-if)# ip address 10.10.10.1 255.255.255.0
switch(config)# interface vlan 20
switch(config-if)# ip address 10.10.20.1 255.255.255.0
  1. Add first-hop redundancy if you have dual distribution/core switches.
switch(config)# interface vlan 10
switch(config-if)# standby 10 ip 10.10.10.1
switch(config-if)# standby 10 priority 110
switch(config-if)# standby 10 preempt
  1. Verify VLAN and trunk state before troubleshooting further.
switch# show vlan brief
switch# show interfaces trunk
switch# show standby brief
  1. Troubleshoot latency or connectivity issues systematically. Check for VLAN mismatches on trunk ports first (the most common cause of "phantom" connectivity issues), then confirm spanning-tree isn't blocking an expected path, and finally check for duplex/speed mismatches on uplinks — all three account for the large majority of real-world campus VLAN problems.

Once VLANs, trunks, and routing are verified end-to-end, the segmentation itself becomes largely "set and forget" — most ongoing work at this layer is adding new VLANs as departments or device types are onboarded, not re-architecting what's already running.

Planning a Campus Switch Refresh and PoE Power Budget

The final piece of the lifecycle is knowing when and how to refresh access-layer hardware — particularly as PoE demands grow with more access points, phones, and IoT devices. Use the templates below as working documents for your own refresh project.

CAMPUS SWITCH REFRESH CHECKLIST
================================

[ ] Phase 1: Current-state audit
    - Inventory all switch models, firmware versions, and
      end-of-support/end-of-life dates
    - Document current port utilization per switch
      (% of ports actively used)
    - Record current PoE draw per switch vs. rated PoE budget

[ ] Phase 2: Future requirements
    - List planned device additions (APs, phones, cameras,
      IoT sensors) for the next 3-5 years
    - Confirm PoE class needed per device type
      (802.3af / 802.3at / 802.3bt)
    - Note any multi-gig (2.5G/5G) uplink requirements for
      Wi-Fi 6E/7 access points

[ ] Phase 3: Vendor and model shortlist
    - Shortlist 2-3 vendors based on comparison criteria above
    - Request quotes with matching port count, PoE budget,
      and uplink speed
    - Confirm licensing model (perpetual vs. subscription)
      for management/cloud features

[ ] Phase 4: Migration planning
    - Define cutover order (least critical closets first)
    - Plan maintenance windows per switch/closet
    - Pre-stage configs before physical swap
    - Confirm rollback plan per closet

[ ] Phase 5: Post-refresh validation
    - Verify VLAN, trunk, and routing config matches pre-refresh
    - Confirm PoE draw is within new budget with headroom
    - Update documentation and asset inventory
POE POWER BUDGET CALCULATION TEMPLATE
=======================================

Per-device PoE draw (typical, plan for worst case):
  802.3af (PoE)     : up to 15.4W  delivered,  ~12.95W at device
  802.3at (PoE+)    : up to 30W    delivered,  ~25.5W  at device
  802.3bt (PoE++)   : up to 60-90W delivered,  ~51-71W at device

Budget formula per switch:
  Required PoE budget = (Number of devices per class) x
                         (Per-device draw for that class) x
                         (Safety margin, typically 1.2x)

Example worksheet:
  Device type          | Count | Class    | Draw/device | Subtotal
  ----------------------|-------|----------|-------------|----------
  VoIP phones           |  __   | 802.3af  | 12.95W      | ____
  Wi-Fi 6E APs           |  __   | 802.3at  | 25.5W       | ____
  Wi-Fi 7 APs             |  __   | 802.3bt  | 51-71W      | ____
  IP cameras (PTZ)       |  __   | 802.3bt  | 51-71W      | ____
  IoT sensors (misc)     |  __   | 802.3af  | 12.95W      | ____
  ----------------------------------------------------------------
  Subtotal (sum above)                                    : ____
  x Safety margin (1.2)                                   : ____
  = Required switch PoE budget                             : ____

  Compare against candidate switch's rated PoE budget.
  If required budget exceeds ~80% of rated budget,
  shortlist a higher-PoE-budget model or add a switch.

Running the audit and calculation above before requesting vendor quotes ensures you're comparing switches on the metric that actually matters for your environment — total usable PoE budget with headroom — rather than just port count or list price.

Bringing It All Together

A switched campus network holds together when each layer is deliberately chosen rather than inherited from whatever was installed last: pick collapsed core or three-tier based on your actual campus size, choose a vendor whose strengths align with what's driving your network — ecosystem maturity, unified wireless-and-routing, or security convergence — configure VLANs and routing with redundancy built in from day one, and refresh hardware based on a real PoE and capacity audit rather than a fixed replacement cycle. Get those four decisions right, and the network becomes something you're managing proactively instead of firefighting.
Latest Passing Reports from SPOTO Candidates
sec lab
EI lab
EI LAB
Sec lab
DClab
EI Lab
DC lab
DC LAB
dc lab
sec lab
Write a Reply or Comment
Don't Risk Your Certification Exam Success – Take Real Exam Questions
Eligible to sit for Exam? 100% Exam Pass GuaranteeEligible to sit for Exam? 100% Exam Pass Guarantee
SPOTO Ebooks
Recent Posts
Switch MAC Address Table: How It Works, How to Manage It, and How to Secure It
Building a Switched Campus Network That Scales: Design, Vendors, Configuration, and Refresh Planning
Bridging the Boardroom and IT: A Realistic Breakdown of ISACA's CGEIT Certification
Engineering Privacy by Design: What the Updated ISACA CDPSE Means for Your Career
CompTIA Security Get Certified Get Ahead: Sy0-701 Study Guide​
Fortinet's NSE Certification Overhaul: What Changed on July 15, 2026 and What You Need to Do Next
How to Pass the CCIE Lab Exam: A Complete Roadmap From Study Plan to Exam Day
Navigating Digital Trust: The 5 Most Valuable ISACA Certifications for Your Career
Thinking Like a CISO: What You Need to Know About the CISSP Exam
Bridging Risk and Strategy: An In-Depth Guide to the ISACA CRISC Certification
Excellent
5.0
Based on 5236 reviews
Request more information
I would like to receive email communications about product & offerings from SPOTO & its Affiliates.
I understand I can unsubscribe at any time.