











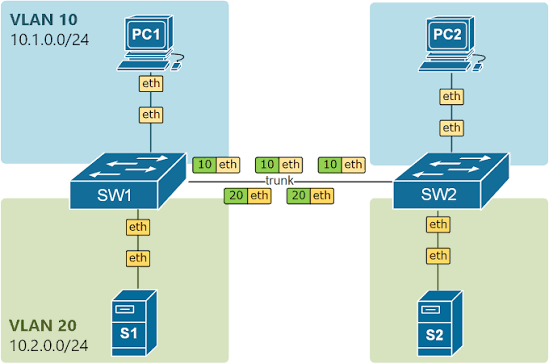
Every 802.1Q trunk link has exactly one VLAN that behaves differently from all the others — the native VLAN, whose traffic travels untagged. Left at its default setting, it’s also one of the more commonly overlooked security gaps in a switched network, and one of the most common causes of a trunk that looks “up” but behaves inconsistently. This guide covers what the native VLAN actually does, why changing it from the default matters, how to configure it correctly, and how to diagnose the mismatch errors that show up when two switches don’t agree on it.
Table of Contents
What Native VLAN Actually Does — and Why VLAN 1 Is a Security Risk
Before changing anything, it’s worth understanding exactly what makes the native VLAN different from every other VLAN crossing a trunk link.
- Understand how 802.1Q tagging normally works. As frames cross a trunk link, switches insert a tag into the Ethernet header identifying which VLAN each frame belongs to — this is how a single physical link can carry traffic for many VLANs while keeping them logically separated.
- Understand the native VLAN exception. Exactly one VLAN on a trunk is designated as native, and its frames are sent untagged rather than carrying an 802.1Q tag. This behavior exists mainly for backward compatibility with older equipment that doesn’t understand 802.1Q tagging at all.
- Recognize the implicit trust problem this creates. Because untagged frames arriving on a trunk are automatically assumed to belong to whatever VLAN the receiving switch considers native, there’s no tag to verify — the switch simply trusts that untagged traffic belongs there.
- Understand why VLAN 1 as the default native VLAN is risky. Since Cisco switches default the native VLAN to VLAN 1, and VLAN 1 is also often left as the default VLAN for unconfigured ports, management traffic, and various Layer 2 control protocols, leaving native VLAN at its default creates a predictable, widely-known target for a specific attack technique.
- Understand VLAN hopping via double-tagging. An attacker connected to an access port can craft a frame with two 802.1Q tags — an outer tag matching the native VLAN, and an inner tag for the VLAN they actually want to reach. Because the first switch strips only the outer (native) tag as it forwards the frame untagged onto the trunk, the inner tag is exposed to the next switch, which then delivers the frame into a VLAN the attacker shouldn’t have access to at all — bypassing normal VLAN isolation.
- Understand why this specifically depends on native VLAN configuration. This double-tagging attack only works when the attacker’s access port happens to be in the same VLAN as the trunk’s native VLAN — which is exactly why leaving native VLAN at the widely-used default of VLAN 1 makes the attack far more predictable to attempt than it would be against a deliberately chosen, non-default native VLAN.
- Understand the recommended mitigation. The standard best practice is twofold: change the native VLAN on trunk links to an ID that isn’t used for any access ports (sometimes a dedicated, unused VLAN reserved specifically for this purpose), and avoid using VLAN 1 for any actual end-device traffic.
With the reasoning behind changing native VLAN established, here’s exactly how to do it.
Configuring a Non-Default Native VLAN on a Cisco Switch
Here’s the step-by-step process for setting native VLAN on a trunk interface.
- Identify your trunk interfaces. Confirm which interfaces are currently configured as trunks before making changes — native VLAN configuration only applies to trunk ports.
Switch# show interfaces trunk- Choose a dedicated, unused VLAN ID for native traffic. A common practice is reserving a VLAN specifically for this purpose (for example, VLAN 999) that carries no actual end-device traffic, rather than reusing an existing production VLAN.
- Create the dedicated native VLAN if it doesn’t already exist.
Switch(config)# vlan 999
Switch(config-vlan)# name NATIVE_UNUSED
Switch(config-vlan)# exit- Set the native VLAN on the trunk interface.
Switch(config)# interface gigabitEthernet 1/0/48
Switch(config-if)# switchport trunk native vlan 999- Repeat identically on the switch at the other end of the trunk. Both ends must agree on the native VLAN — configuring only one side creates exactly the mismatch condition covered in the next section.
SwitchB(config)# interface gigabitEthernet 1/0/1
SwitchB(config-if)# switchport trunk native vlan 999- Optionally, tag native VLAN traffic instead of leaving it untagged. Some environments prefer to force all traffic on a trunk to be tagged, removing the untagged-native-VLAN concept entirely — this is a global setting that changes behavior for all trunks on the switch.
Switch(config)# vlan dot1q tag native- Verify the change took effect on both switches.
Switch# show interfaces gigabitEthernet 1/0/48 trunkConfirm the “Native vlan” field shows your intended VLAN ID on both ends.
- Check the logs for any mismatch warnings after the change. If you changed only one side, or made a typo, Cisco switches will generate a specific console warning almost immediately — worth checking before considering the change complete.
Once both ends of every trunk link agree on native VLAN, and that VLAN carries no real end-device traffic, you’ve closed off the most common version of the VLAN-hopping technique described earlier — but it’s worth knowing how to recognize and fix a mismatch quickly if one does occur, whether from this change or any future misconfiguration.
Diagnosing and Fixing a Native VLAN Mismatch
A native VLAN mismatch produces a distinctive symptom: the trunk link stays up, but behaves inconsistently, and Cisco switches are usually explicit about flagging it.
- Recognize the telltale log message. Cisco switches running CDP will typically generate a console message similar to “native VLAN mismatch discovered” as soon as they detect disagreement between the native VLAN advertised by a neighbor and their own configuration — this is often the very first sign something’s wrong.
- Confirm the mismatch directly by comparing both ends. Don’t rely on the log message alone — check the actual configured native VLAN on both switches to confirm and quantify the mismatch.
Switch# show interfaces gigabitEthernet 1/0/48 trunk- Understand why STP may place the port in a blocking-like or inconsistent state. Some Cisco platforms will place a trunk port with a detected native VLAN mismatch into an inconsistent state to prevent potential loops or leaked traffic, rather than allowing it to continue forwarding traffic through a known-inconsistent configuration.
Switch# show spanning-tree inconsistentports- Identify which side has the “wrong” value. Since fixing this just requires making both sides match, determine which native VLAN is actually intended for that trunk (based on your documented design) rather than guessing — this matters especially if the trunk carries multiple VLANs and the correct native VLAN isn’t obvious from context.
- Correct the native VLAN on whichever side is misconfigured.
Switch(config)# interface gigabitEthernet 1/0/48
Switch(config-if)# switchport trunk native vlan 999- Verify CDP neighbor information reflects the fix. CDP is often what surfaces the mismatch in the first place, so checking it again after the fix confirms the switches now agree.
Switch# show cdp neighbors detail- Re-check trunk state and confirm the inconsistent port state has cleared. If STP had placed the port into an inconsistent state, confirm it returns to normal forwarding behavior once the mismatch is resolved.
Switch# show interfaces gigabitEthernet 1/0/48 trunk
Switch# show spanning-tree interface gigabitEthernet 1/0/48- Watch for recurrence after any future trunk configuration change. Since this mismatch is easy to reintroduce accidentally (for example, when adding a new switch to an existing trunk topology without matching its native VLAN configuration), treat verification of native VLAN agreement as a standard step whenever trunk configuration changes.
The pattern to remember: a native VLAN mismatch almost always shows up as an explicit log message and a show interfaces trunk comparison that immediately reveals the disagreement — it’s one of the more self-diagnosing issues in Layer 2 troubleshooting, precisely because Cisco built in dedicated detection for it via CDP.
Native VLAN Configuration Cheat Sheet: Cisco and HP/Aruba
For quick reference during deployment or troubleshooting, here’s a consolidated command set across the two major vendors.
# --- Cisco IOS: Configuration ---
Switch(config)# vlan <native-vlan-id>
Switch(config-vlan)# name <native-vlan-name>
Switch(config)# interface <trunk-interface>
Switch(config-if)# switchport trunk native vlan <native-vlan-id>
Switch(config)# vlan dot1q tag native                    # Optional: tag all traffic, remove untagged native concept

# --- Cisco IOS: Verification ---
Switch# show interfaces trunk                                # Native VLAN, allowed/active VLANs
Switch# show interfaces <interface> trunk                      # Native VLAN detail for one interface
Switch# show cdp neighbors detail                                 # Confirms mismatch detection via CDP
Switch# show spanning-tree inconsistentports                        # Check for STP-blocked mismatch ports

# --- HP/Aruba (ArubaOS-Switch / ProVision CLI): Configuration ---
switch(config)# vlan <native-vlan-id>
switch(vlan-<native-vlan-id>)# name <native-vlan-name>
switch(vlan-<native-vlan-id>)# untagged <trunk-port>        # Native/untagged VLAN membership on the trunk port

# --- HP/Aruba: Verification ---
switch# show vlans                                              # VLAN summary including untagged/tagged membership
switch# show vlan ports <port-number>                              # Per-port VLAN detail

# --- Universal troubleshooting checklist (any vendor) ---
# 1. Compare native/untagged VLAN setting on both ends of the trunk directly
# 2. Check logs (Cisco: CDP-based mismatch warning) for an explicit alert
# 3. Confirm the fix by re-checking trunk detail on both sides
# 4. Re-verify after any future change to the same trunk link
Keep this cheat sheet paired with the mismatch-diagnosis steps above — the show interfaces trunk command on Cisco (and its show vlans / show vlan ports equivalents on HP/Aruba) will answer almost every native VLAN question in a single lookup.


Comments