An F5 SSL certificate refers to an SSL/TLS digital certificate installed on an F5 BIG-IP device to enable secure (HTTPS) traffic management. In simple terms, it’s the same kind of certificate used on any secure web server – a file that verifies identity and enables encryption – but uploaded to the F5 BIG-IP (a popular load balancer and application delivery controller). By installing an SSL certificate on F5, the device can terminate SSL connections on behalf of backend servers, ensuring data between clients and the BIG-IP is encrypted. This capability allows network engineers to offload encryption tasks from web servers and centralize certificate management on the F5 platform.
F5 BIG-IP devices (particularly running the Local Traffic Manager module) are often deployed in front of web servers as a reverse proxy. They handle client connections, including SSL/TLS handshakes, and then forward requests to internal servers. In this article, we’ll break down SSL/TLS basics and explain how F5 BIG-IP uses SSL certificates for SSL termination (also known as SSL offloading). We will also provide step-by-step guidance on installing and managing SSL certificates on an F5 BIG-IP, using both the graphical user interface (GUI) and the command-line interface (CLI). Beginner network engineers will learn the role of SSL certificates, how F5 handles encrypted traffic, and how to configure F5 devices for HTTPS.
Table of Contents
Understanding SSL/TLS Certificates (SSL 101)
SSL/TLS certificates are fundamental to secure web communication. An SSL certificate is essentially a digital credential that authenticates a server’s identity and enables encryption. For example, an SSL certificate on a website verifies that the site is owned by a specific organization and allows the web browser and server to establish an encrypted connection. SSL (Secure Sockets Layer) and its successor TLS (Transport Layer Security) use these certificates to ensure that data exchanged between a client (like a web browser) and a server is kept private and unaltered.
When a user connects to an HTTPS website, an SSL/TLS handshake occurs. This handshake is a brief exchange in which the client and server introduce themselves, decide on encryption methods, and perform a key exchange to set up a secure session. During the handshake, the server presents its SSL certificate to the client as proof of identity. The client will validate the certificate (checking that it’s issued by a trusted Certificate Authority and not expired or revoked). Once trust is established, the two sides generate shared secret keys for encryption.
Figure: Simplified SSL/TLS handshake between a client and server. The client initiates with a “Client Hello” offering supported ciphers, the server responds with a “Server Hello” and sends its certificate to the client. The client then sends key exchange information (encrypted with the server’s public key from the certificate), and after a few more steps both sides finish the handshake and begin encrypted communication.
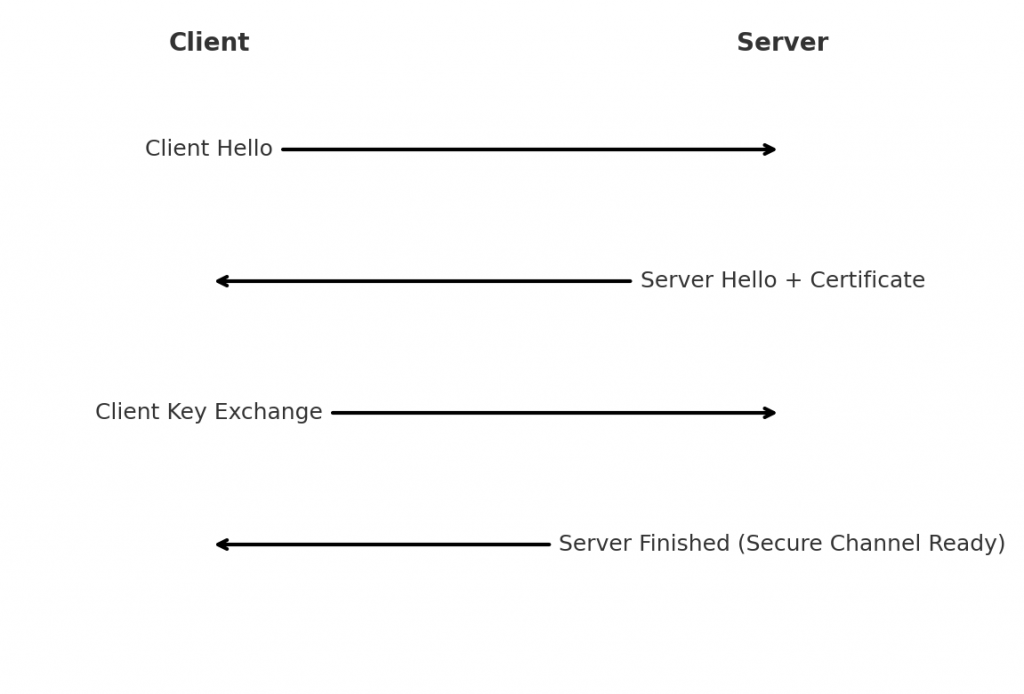
In summary, the SSL/TLS handshake allows the client and server to verify each other’s identity and agree on encryption keys for the session. The SSL certificate plays a crucial role here: it contains the server’s public key and identity information, enabling the client to encrypt the secret key material and trust that it’s communicating with the legitimate server. Without a valid certificate, the browser will warn the user of an untrusted connection.
Certificate Authorities (CAs): Most SSL certificates are signed by trusted third-party CAs. This signature assures clients that the certificate (and thus the server) is legitimate. On F5 BIG-IP, you will typically import a certificate that has been signed by a CA (or use a self-signed certificate for testing, which will trigger browser warnings). The format of certificates is usually PEM encoded text, containing the public certificate and a corresponding private key. Both the certificate and its private key must be installed on the F5 for the device to present the certificate and decrypt incoming data.
How F5 BIG-IP Handles SSL Termination and Offloading
F5 BIG-IP devices can act as the termination point for SSL/TLS, which is often called SSL offloading. In SSL offloading, the BIG-IP handles all the encryption/decryption work, and the traffic sent to the backend servers is in plaintext HTTP. This removes the cryptographic burden from the servers. In fact, “SSL offloading is the process of removing SSL/TLS encryption from incoming traffic before it reaches a web server,” thereby freeing the server from performing expensive encryption computations. In practice, the F5 BIG-IP handles the SSL handshake with the client, decrypts the data, and passes along the request to the internal server over regular HTTP. Offloading not only improves server performance but also centralizes certificate management on the BIG-IP device.
Figure: F5 BIG-IP performing SSL offloading. The client connects over HTTPS (SSL/TLS) to the F5, which has the server’s SSL certificate installed. The BIG-IP device decrypts the traffic and forwards it to the backend web server over HTTP (unencrypted). This way, the BIG-IP handles all SSL processing, reducing the load on the server.

On an F5 BIG-IP, SSL termination is configured using SSL profiles. A Client SSL profile is applied to the virtual server (listener) to manage incoming client-side HTTPS connections. When you assign a Client SSL profile to a virtual server, the BIG-IP will present the configured certificate to clients and perform the SSL handshake on behalf of the server. According to F5’s documentation, when you enable a Client SSL (or Server SSL) profile on a virtual server, the BIG-IP “offloads SSL processing from the destination server.” In other words, the BIG-IP becomes the endpoint for the secure connection, and the internal server no longer needs to handle SSL. The BIG-IP decrypts client requests and, by default, sends them in clear text to the target server (it can also encrypt to the server if configured for end-to-end SSL, but in a pure offload scenario it does not).
The SSL profile on F5 allows you to specify the certificate and private key that the BIG-IP will use. It also lets you configure protocols and ciphers if needed. Typically, you base your custom profile on F5’s built-in “clientssl” profile (which has default settings for TLS versions, ciphers, etc.) and just plug in your certificate and key. Optionally, if your certificate chain includes an intermediate CA, you would upload that as well and attach it as a certificate chain in the profile so that clients receive the full chain.
It’s worth noting that F5 can also do SSL bridging or re-encryption (sometimes called “end-to-end SSL”). In that case, you would configure both a Client SSL profile (for the client side) and a Server SSL profile (for the server side). The BIG-IP would decrypt the client’s request, then initiate a new encrypted connection to the backend server. This is useful if you need encryption on both sides (for compliance or security reasons). For most basic deployments, however, SSL offload is used – the BIG-IP decrypts incoming traffic and sends it to servers over HTTP. Either way, an SSL certificate is needed on the F5 for the client side, and F5’s SSL Traffic Management system gives you flexibility in how to handle the encryption.
Installing and Managing SSL Certificates on F5 BIG-IP
Once you understand the role of an SSL certificate on F5 (to terminate incoming HTTPS connections), the next step is to install the certificate and private key on the F5 BIG-IP and configure the device to use them. F5 BIG-IP offers two primary ways to manage certificates: through the graphical Configuration Utility (GUI) and through the TMSH CLI. Below, we provide practical guidance for both methods.
Using the F5 GUI to Install an SSL Certificate
Installing an SSL certificate via F5’s web-based GUI (Traffic Management User Interface) is straightforward and recommended for beginners:
- Prepare the Certificate and Key: Ensure you have the certificate file (usually
.crtor PEM format) and its corresponding private key (.keyfile). If your certificate was issued by a CA, you should have these files from the Certificate Authority. If you need to create a new certificate, you can generate a Certificate Signing Request (CSR) on the F5 as well – but in most cases, you’ll import an existing certificate and key. - Navigate to Certificate Management: Log in to the F5 BIG-IP Configuration Utility (https web interface). On the menu, go to System > Certificate Management > Traffic Certificate Management > SSL Certificate List. This is where all SSL certificates for traffic (data plane) are managed.
- To import an existing certificate, click the Import button.
- To create a new certificate/CSR, click Create (which can generate a self-signed cert or a CSR for a CA to sign).
- Import the Certificate and Key: If importing, you will import the certificate and key as two separate objects, but with the same name. For example, if your site is
example.com, you might name the certificate object “example.com.crt” and the key “example.com.key”. In the Import dialog, select the type (Certificate or Key), provide a name, and either paste the contents or upload the file. First import the private key (type “Key”), then import the certificate (type “Certificate”) using the same name (e.g., “example.com”) – the BIG-IP will pair them by name as a certificate/key pair. After importing, you should see the new certificate listed in the SSL Certificate List, and its status should show as “Active”. - Create a Client SSL Profile: Importing the cert and key into F5 is not enough by itself – you must also create or configure a Client SSL profile to use that certificate. Navigate to Local Traffic > Profiles > SSL > Client, and click Create to make a new client SSL profile (or you can update an existing one). Give it a name (e.g.,
clientssl_example). For Parent Profile, you can selectclientssl(the default template for client SSL profiles). In the profile settings, you will find fields for Certificate and Key – select the certificate and key you imported (they will appear in the dropdown by the name you gave them). If you have an intermediate CA certificate, you can also select it in the Chain field (this is optional and only needed if your cert isn’t directly signed by a root CA). Leave other settings at default unless you have specific requirements (the defaults will allow modern TLS versions and a reasonable cipher suite). Click Finished to create the profile. - Attach the SSL Profile to a Virtual Server: Finally, apply this profile to the relevant virtual server (the virtual server is the BIG-IP’s listener for client traffic, often corresponding to the VIP for your application). Go to Local Traffic > Virtual Servers > Virtual Server List, and either create a new virtual server for HTTPS or modify an existing one. For an HTTPS virtual server, you’ll set the Service Port to 443 and add an SSL Profile (Client). In the virtual server settings, find the SSL Profile (Client) setting and select the name of the SSL profile you created (e.g.,
clientssl_example). This tells the BIG-IP to use your certificate for incoming connections on this virtual server. You would typically also have an HTTP profile enabled (since after decryption the traffic is HTTP) and a default pool pointing to your backend servers. If you are offloading SSL (not re-encrypting to servers), leave SSL Profile (Server) blank/None. Save or update the virtual server.
At this point, the F5 BIG-IP will begin handling HTTPS traffic using the installed certificate. You can test by browsing to the URL of the virtual server (which should now be HTTPS). The browser should show the padlock icon and no certificate warnings if everything was set up correctly and the certificate is valid (trusted by the browser). Essentially, the BIG-IP is now front-ending your application, presenting the certificate to clients and offloading the SSL processing.
Using the CLI (TMSH) to Import Certificates and Keys
F5’s Traffic Management Shell (TMSH) provides commands to manage SSL certificates from the command line. This can be faster for those comfortable with CLI and is useful for automation or when working via SSH. Here’s how to do the key steps via tmsh:
- Transfer Files to the F5: Ensure your certificate and key files are accessible to the BIG-IP. You might use SCP to upload files to
/var/tmp/on the F5 (which is a common staging location). - Import the Key and Certificate using tmsh: Open an SSH session to the F5 and enter TMSH (by typing
tmsh). Then run the following commands to import the files into the BIG-IP’s certificate store:
tmsh install sys crypto key example.com.key from-local-file /var/tmp/example.com.key
tmsh install sys crypto certificate example.com.crt from-local-file /var/tmp/example.com.crt
- Each command will create a key or certificate object in the BIG-IP. In this example, we import a key and certificate for “example.com”. The object names will be
example.com.keyandexample.com.crtrespectively (based on the file names given). Make sure to use the same base name for the cert and key so they pair up as a unit. Theinstall sys cryptocommand copies the files into the BIG-IP system and makes them available for use. You can verify the import by running:tmsh list sys file ssl-cert example.com.crt(and similarly for the key withssl-key) which should display the certificate details. - Create an SSL Profile via CLI: After importing the cert and key, create a client SSL profile that references them. For example:
tmsh create ltm profile client-ssl clientssl_example \
     defaults-from clientssl \
     cert example.com.crt key example.com.key
- This creates a new Client SSL profile named
clientssl_examplethat inherits settings from the built-inclientsslprofile and uses the certificate/key we imported. (If you have a certificate chain file, you could include achain <filename>parameter as well). Thedefaults-from clientsslpart ensures it starts with the default recommended SSL settings and you only override the cert/key. Alternatively, you could modify an existing profile via CLI withmodify ltm profile client-ssl ...to set the cert and key. - Attach the Profile to a Virtual Server: Finally, apply the profile to a virtual server. You can do this via CLI as well. For instance, to create a new HTTPS virtual server on 198.51.100.100:443 that uses this profile (and an existing pool
app_pool), you might use:
tmsh create ltm virtual vs_web_app_ssl destination 198.51.100.100:443 \
     ip-protocol tcp profiles add { clientssl_example http } \
     pool app_pool
- This single command configures a basic HTTPS virtual server using the
clientssl_exampleprofile (for SSL termination) and an HTTP profile (for layer7 processing after decryption), forwarding traffic toapp_pool. If the virtual server already exists (say you initially had a port 80 HTTP virtual), you can instead usemodify ltm virtual vs_web_app_ssl profiles add { clientssl_example }to attach the SSL profile. Once the profile is attached, the BIG-IP will present the certificate and handle SSL on that virtual server.
Note: Managing SSL via CLI is powerful for automation. You can script the import and profile creation, which is handy in large environments or when updating certificates (for example, using a script to install new certs when they are renewed). Always be careful to match certificate and key names, and if removing or replacing a certificate, ensure you update any profiles that use it.
Tips for Managing SSL Certificates on F5
- Certificate Formats: BIG-IP accepts PEM format for keys and certificates. If you have a PFX (PKCS#12) file, you’ll need to extract the
.crtand.keyfirst. The GUI has an option for PKCS#12 import as well, which can import the cert and key together (you provide the passphrase). - Intermediate Certificates: If your SSL certificate requires an intermediate CA, import that as a CA Certificate (in the Certificate Authority section of Traffic Certificate Management) or as an external certificate, and then specify it as the “Chain” in the Client SSL profile. This ensures the BIG-IP presents the full certificate chain to clients, preventing trust issues.
- Default Device Certificate vs Traffic Certificate: F5 ships with a self-signed device certificate (used for the management UI by default). This is different from Traffic Certificate Management. Make sure you’re adding your cert under Traffic Certificate Management for use in data traffic (virtual servers). The device (management) certificate is only for the admin GUI or features like APM portal access.
- Renewal and Updates: When it’s time to renew a certificate, you can import the new certificate (and key if changed) with the same name, effectively replacing the old one. BIG-IP allows you to update the certificate on the fly. It’s wise to plan a maintenance window for cert updates, but typically swapping an expiring cert for a new one on F5 is seamless if done correctly. You might import the new cert under a temporary name, then modify the SSL profile to point to the new cert/key objects to minimize any interruption.
- SSL Profile Settings: For beginner purposes, using the default SSL profile settings (via
defaults-from clientssl) is adequate and ensures strong security. As you become more advanced, you might tune settings like allowed TLS versions (e.g., disable TLS 1.0/1.1), ciphers, enabling Perfect Forward Secrecy, etc., all of which can be done in the SSL profile settings.
By following the above steps, you can confidently manage SSL certificates on an F5 BIG-IP system. The F5 will then take care of all encryption and decryption, presenting a secure interface to clients. This not only simplifies certificate handling (since the cert resides only on the F5 rather than every server) but also can improve your overall throughput by leveraging F5’s optimized SSL stack (often including hardware acceleration for cryptographic operations).









Comments