


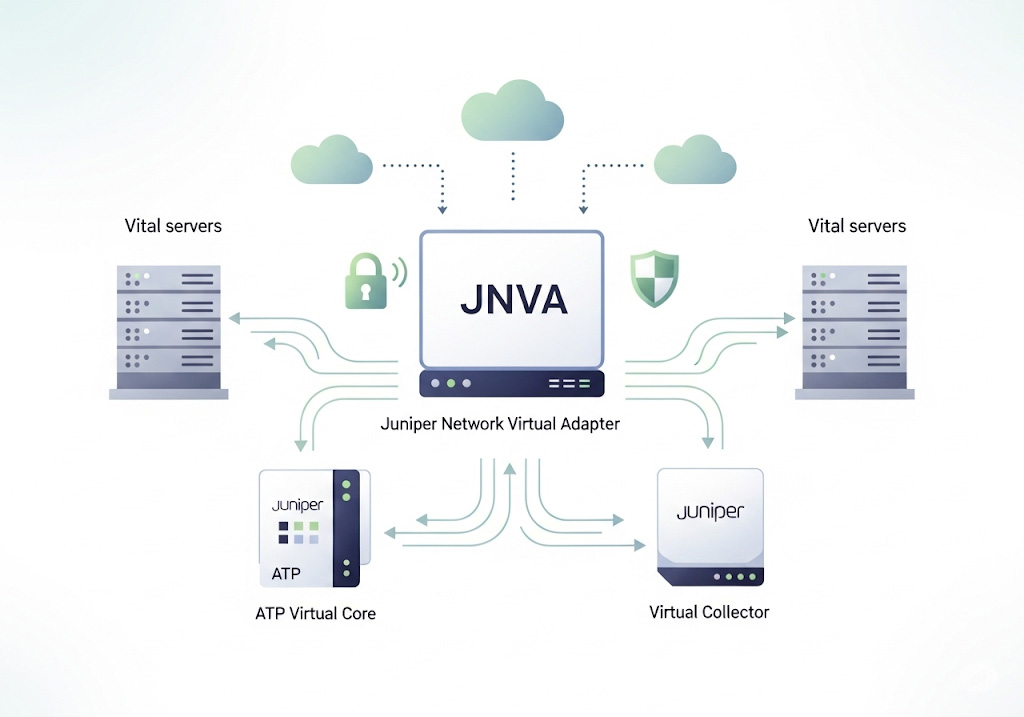
The Juniper Network Virtual Adapter (JNVA) is a software-defined network interface deployed alongside Juniper’s virtual appliances—such as the ATP (Advanced Threat Prevention) Virtual Core and Virtual Collector—that enables packet capture, traffic inspection, and secure management within virtualized environments. Unlike a physical NIC, the JNVA leverages hypervisor-level virtualization to present one or more virtual interfaces to the appliance VM, each tied to a dedicated vSwitch and port group on the ESXi host. This abstraction ensures that the appliance can ingest mirrored traffic (SPAN/TAP), segment management traffic, and enforce security policies without requiring additional physical network adapters.
Table of Contents
Prerequisites and Planning
Before you begin installation, ensure your environment meets the following requirements:
- Hypervisor Compatibility: VMware ESXi 5.5 or later and vSphere Client 5.5/6.0/6.5.
- VM Resources: vCPU, memory, and disk sizing per the appliance model (for example, the v500M model requires 8 vCPUs and 32 GB RAM).
- Network Design: At least two VLANs or port groups—one for management, one (or more) for traffic capture. If you intend to mirror multiple SPAN/TAP sources, plan separate port groups to avoid mixing traffic streams.
- Permissions: vSphere user with privileges to deploy OVAs, edit VM settings, and configure host networking (vSwitch and port groups).
- Licensing and Support Files: Download the OVA package (including
.ovfand.vmdkfiles) and have your ATP license key ready for import after deployment.
Step-By-Step Installation
1. Deploy the Juniper ATP OVA to Your VMware Environment
- Download the OVA: Obtain both the OVF and VMDK files from Juniper’s support portal and place them in the same folder.
- Launch Deployment Wizard: In the vSphere Client, select File → Deploy OVF Template, then point to the downloaded
.ovffile. - Review and Accept EULA: Read the End User License Agreement and click Next to proceed.
- Name and Location: Assign a clear VM name (for example,
ATP-vCore-01) and choose the target datacenter and cluster. - Storage and Disk Format: Select a datastore with sufficient free space. The default is Thick Provision Lazy Zeroed (512 GB); you may opt for Thin Provision to conserve space.
- Network Mapping: Map the virtual adapters to their corresponding port groups:
- Management: Connects to your management VLAN/port-group.
- Data/Capture: Connects to the promiscuous-mode vSwitch for SPAN/TAP traffic.
- Optional: Additional adapters for dedicated logging or email collector traffic.
- Customize Appliance Settings: Enter static IP parameters (address, netmask, gateway, DNS), hostname, CLI admin password, and device key passphrase.
- Adjust Resource Reservations: Uncheck “Power on” to first reserve CPU and memory per Juniper’s sizing guide. Right-click the VM → Edit Settings → Resources tab. Set CPU and memory reservations equal to the appliance model requirements (for example, 8 vCPUs and 32 GB RAM for v500M).
- Power On and Initial Licensing: Start the VM, SSH into the CLI, run
show uuidto obtain the appliance UUID, and activate your license in the Juniper portal.
2. Configure the Virtual Switch and Port Groups
To ensure the JNVA can capture traffic in promiscuous mode, configure your vSwitch as follows:
- Create/Select a vSwitch: In the ESXi host client, go to Networking → Virtual switches and choose the switch for your capture traffic.
- Enable Promiscuous Mode: Edit the vSwitch’s security settings and set Promiscuous Mode to Accept.
- Define Port Groups:
- vCollector: Port group attached to the Juniper appliance’s capture adapter—must be in promiscuous mode.
- vSource: Port group for the VMs or physical uplinks whose traffic you wish to span—also in promiscuous mode if on the same vSwitch.
- Assign Adapters: When editing the VM’s hardware, bind each virtual network adapter (e.g.,
Network adapter 1→ Management port group;Network adapter 2→ vCollector port group).
<div style=”margin: 1em 0; padding: 0.5em; border-left: 4px solid #007ACC;”> <strong>Tip:</strong> If your traffic source resides on a different vSwitch, you must use a physical SPAN/TAP and uplink it to the capture switch. Virtual-only mirroring across vSwitches is unsupported. </div>
3. (Optional) Enable Nested Virtualization for Windows Behavior Analysis
If you plan to use the Windows 10 sandbox feature (introduced in ATP 5.0.5) for malware detonation, nested virtualization must be enabled:
- Power Off the appliance VM.
- Upgrade VM Hardware Version: In the VM’s summary pane, click Upgrade VM compatibility to at least ESXi 6.0 (VM hardware version 11).
- Expose Virtualization Extensions: Edit VM settings → CPU → check Expose hardware-assisted virtualization to the guest OS.
- Power On and verify that the sandbox module initializes without errors.
Post-Installation Validation
- Interface Status
- SSH into the appliance and run
show interfaces all. Confirm that the management and capture adapters are present and linked.
- SSH into the appliance and run
- Capture Verification
- On the vSphere host, generate harmless traffic in the source VLAN and use
tcpdumpor the Juniper packet‐capture CLI to verify ingestion on the virtual collector interface.
- On the vSphere host, generate harmless traffic in the source VLAN and use
- Management Access
- From your administration workstation, ping and SSH to the management IP. Log in via CLI or GUI to ensure credentials and licensing are correctly applied.
Troubleshooting Common Issues
| Symptom | Likely Cause | Resolution |
|---|---|---|
| No traffic to vCollector adapter | vSwitch not in promiscuous mode | Enable Promiscuous Mode on vSwitch and port group. |
| Appliance reports “interface not found” | Adapter mis‐mapped in VM settings | Re-map the adapter to the correct port group and restart the VM. |
| VM fails to power on after resource edits | Reservations exceed host capacity | Adjust resource reservations or move VM to a host with sufficient RAM/CPU. |
| Windows sandbox not detected at runtime | Nested virtualization not enabled | Enable hardware virtualization extensions and upgrade VM hardware. |
Comments