


Connecting a Windows 10 workstation to a Juniper Networks environment can encompass two primary scenarios:
- Local Management Access – Physically accessing and managing Junos OS devices (routers, switches, or firewalls) via the console port from a Windows 10 PC.
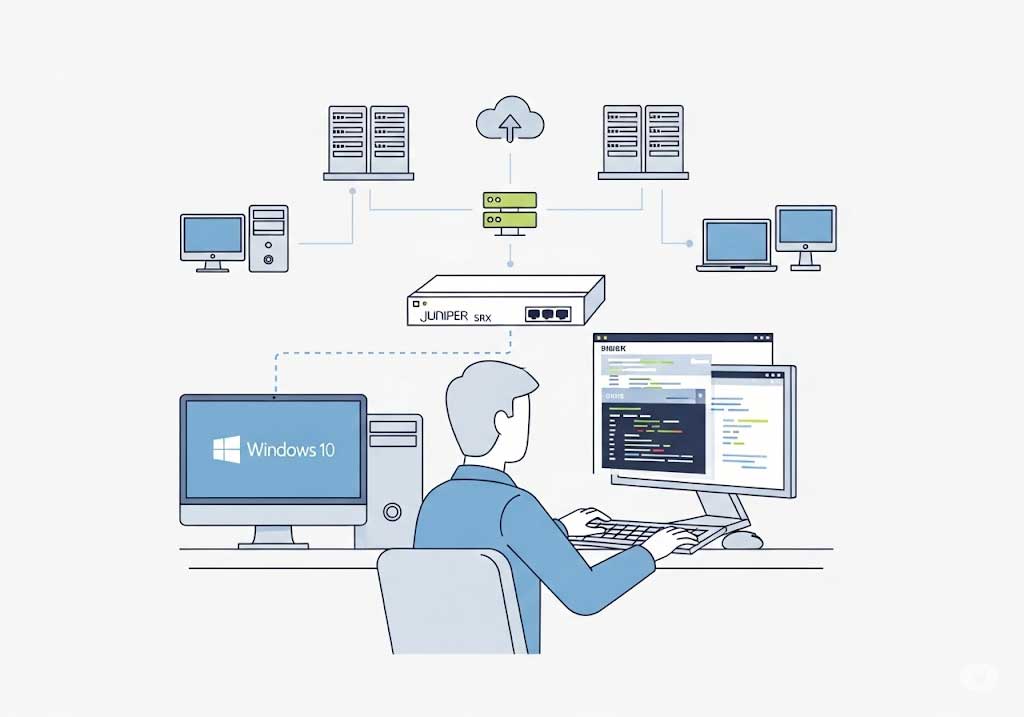
- Remote Secure Access – Establishing an SSL VPN tunnel from Windows 10 into a corporate Juniper Secure Access (SRX Series) network using the Juniper Secure Connect client.
Below, we first answer the core question for each scenario and then dive deeper into planning, prerequisites, step-by-step procedures, and best practices.
Table of Contents
1. Local Management Access via Console Port
1.1 What Is It?
Local management access refers to the direct, out-of-band connection from your Windows 10 laptop or desktop to a Junos OS device’s console port. This method is used for the very first-time setup or recovery when network connectivity (SSH, Telnet) is not yet configured or available. By connecting a USB-to-serial (or native serial) cable from your Windows 10 machine to the device’s console port, you can view the boot process, log in as root, and perform initial configuration via the Junos OS CLI.
1.2 Why Use Console Access?
- First-Time Deployment: New Juniper devices ship with all remote management protocols disabled by default; console access is the only way to begin configuration.
- Troubleshooting and Recovery: If SSH or in-band management is misconfigured or a device is unreachable, console access allows administrators to regain control.
- Secure Out-of-Band: Console connections do not traverse production data networks, reducing the risk of man-in-the-middle attacks during initial setup.
1.3 Prerequisites
- Hardware:
- Windows 10 PC with an available USB port (or COM port).
- USB-to-Serial adapter (FTDI or Prolific chipset recommended) or a native RS-232 serial port.
- RJ-45 to DB-9 rollover (Cisco-style) console cable.
- Software:
- Windows 10-compatible serial driver for your USB adapter.
- Terminal emulator (e.g., PuTTY, Tera Term, or SecureCRT).
- Device: A powered-off Juniper device with an accessible console port on its front panel.
1.4 Step-by-Step Guide
- Install the Serial Driver
- Plug in your USB-to-Serial adapter.
- Install the vendor-provided driver so that Windows assigns a COM port (e.g., COM3).
- Launch Your Terminal Emulator
- Open PuTTY or Tera Term.
- Select Serial as the connection type.
- Set the COM port to the one assigned (e.g.,
COM3). - Configure serial settings: 9600 baud, 8 data bits, no parity, 1 stop bit, no flow control.
- Connect the Cable
- Attach the RJ-45 end to the Juniper device’s Console port.
- Attach the DB-9 end to your USB-to-Serial adapter.
- Power On the Juniper Device
- Turn on the device.
- In your terminal emulator, you should see the Junos OS boot messages.
- Log In and Enter CLI
- At the
login:prompt, typeroot(no password is required on first login). - You’ll see the
root@%prompt—typeclito enter the Junos CLI, thenconfigureto access configuration mode:
- At the
kotlin
root@% cli
root@> configure
[edit]
root@#
From here, you can set host-name, root password, and network interfaces for in-band management.
1.5 Best Practices
- Use a Dedicated Out-of-Band Network: In production, keep console and management interfaces on a separate switch or VPN for enhanced security.
- Secure Physical Access: Store console cables and management PCs in locked facilities; console access bypasses network-level controls.
- Document COM Port Assignments: Label adapters and note the COM port on each admin workstation to avoid confusion.
2. Remote Secure Access via Juniper Secure Connect
2.1 What Is It?
Juniper Secure Connect is a client-based SSL VPN application for Windows 10 that establishes encrypted tunnels to SRX Series firewalls or Juniper Secure Access gateways. Once connected, users can securely access corporate resources—file shares, intranet sites, or internal applications—from any Internet-connected location.
2.2 Why Use Juniper Secure Connect?
- Zero-Trust and Compliance: Enforces endpoint checks (antivirus status, OS patch level) before granting access.
- Ease of Use: Lightweight client that installs quickly and runs without requiring administrator privileges.
- Granular Access: Supports full-tunnel or split-tunnel modes, per-application VPN (Secure Application Manager), and MFA integration.
2.3 System Requirements
- Operating System: Windows 10 (64-bit recommended).
- Hardware: Minimum 2 GHz CPU, 4 GB RAM, 100 MB free disk space.
- Network: Outbound HTTPS (TCP 443) to the SRX gateway.
- Permissions: Standard user privileges are sufficient for client installation; the admin must configure the SRX first.
2.4 Preparing the SRX Gateway
Before end users can connect, the SRX Series device must be configured for SSL VPN:
- Configure Remote Access Service
pgsql
set security vpnglobal vpn-handshake-protocol ipsec set security ssl set security vpnglobal vpn-handshake-protocol ipsec
set security ssl vpn-profile <profile-name>
set security ssl vpn ssl-policy <policy-name>
… - Define User Authentication
- Local database or RADIUS/LDAP integration.
- (Optional) Configure multifactor authentication with Duo or SMS.
- Assign VPN Address Pools
pgsql
set security nat source pool vpn-pool address 10.0.0.100/30 set security address-book global address VPN-Subnet 10.0.0.0/24- Commit and Verify
show security ssl statusshow interfaces st0
Note: Detailed SRX configuration is beyond this blog’s scope. Refer to the SRX Series Security Guide for full SSL VPN setup.
2.5 Installing Juniper Secure Connect on Windows 10
- Download the Installer
- Navigate to your SRX’s SSL VPN portal (e.g.,
https://vpn.example.com). - Click the “Install Juniper Secure Connect” link.
- Navigate to your SRX’s SSL VPN portal (e.g.,
- Run the Installer
- Launch the
.exefile. - Accept the EULA and choose the installation folder (default is under
%APPDATA%\Juniper Networks). - Complete the wizard; no restart is required.
- Launch the
- First-Time Launch
- On launch, enter the VPN portal URL provided by your administrator.
- The client retrieves configuration and certificates automatically.
2.6 Establishing a VPN Connection
- Open Juniper Secure Connect
- Double-click the desktop icon or run from the Start menu.
- Configure Connection Settings
- Portal URL: e.g.,
https://vpn.example.com - Username and Password: Your corporate credentials.
- (Optional) Second Factor: If MFA is enabled, enter the OTP or approve via an authenticator app.
- Portal URL: e.g.,
- Connect
- Click Connect.
- The client shows progress as it negotiates the SSL VPN tunnel, performs host checking (if configured), and assigns an
st0interface with an IP from the VPN pool.
- Verify Connectivity
- Open a Command Prompt and run
ipconfig /all—you should see a new Juniper Secure Connect adapter with the VPN IP. - Ping an internal resource to confirm access.
- Open a Command Prompt and run
- Disconnect
- Right-click the client icon in the system tray and select Disconnect.
2.7 Troubleshooting
| Symptom | Possible Cause | Resolution |
|---|---|---|
| Cannot reach VPN portal URL | DNS or network issue | Verify DNS resolution; try IP address. |
| “Connection Failed” | Invalid SSL certificate or portal URL | Ensure the SRX’s certificate is trusted; re-enter URL. |
| Host Checker fails | Missing endpoint compliance (AV, patch) | Install required software; reboot and retry. |
No IP on st0 interface | VPN pool exhausted or wrong profile | Increase pool size; confirm the user is in correct VPN profile. |
| Slow performance | Mismatched MTU or split-tunnel issues | Set MTU to 1400 on the adapter; review split-tunnel configuration. |
Comments